

Como les prometí en el blog anterior, paso a explicarles cómo realicé esta primera versión del Punto Misterioso. Este punto puede trabajarse sobre una base de filet de medio punto o punto alto según se desee obtener hojitas más redondeadas o más alargaditas. También dependerá del ganchillo y el hilo utilizado. Para ganchillos pequeños (2.00 y menores), recomiendo usar la base de mp y para ganchillos y lanas más gruesas (del 3.5 en adelante) recomiendo utilizar la base de punto alto.
La muestra de las fotos se trabajó con un crochet 2.00 mm y dos hebras de lana extra fina.
As promised, here are the steps I used to create the first version of the Mistery Stitch. This stitch can be worked over a filet base of dc or hdc, depending on the look you want to achieve, hdc for rounder, chunkier leaves, or dc for a more elongated, stylized look. This decision will also depend on the type of yarn and crochet hook used. For smaller hooks (2.00mm and smaller) go for a hdc base, if using larger hooks (3.5mm) or chunkier yarns, go for a dc base.
The swatch in these pictures was worked using a 2.00 mm hook and 2 strands of extra fine baby weight yarn.

Se comienza sobre una base de cadenetas múltiplo de 8 + 5 (si trabajs en medio punto o media vareta) ó +6 (si trabajas en punto alto, vareta o punto entero). Por ejemplo, si trabajarás con mp y deseas tener 10 motivos de hojas, harás una cadeneta de 80 + 5 cadenetas adicionales. Y trabajamos tres vueltas, siguiendo este esquema:
We will begin by stitching the crochet base as shown in the graphs below, beginning with a base chain multiple of 8 + 5 (if working hdc) or 8 + 6 (if working a dc base)

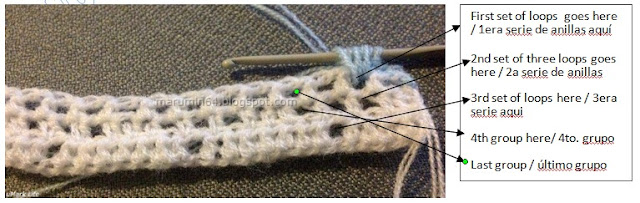
Al final de la tercera vuelta, cambiamos de color de lana y comenzamos con el "bordado" de las hojas en la 4ta. vuelta. Se trabajan 5 grupos de anillas para formar cada hoja. Trabaje 4 pb (hasta llegar al segundo espacio de cad). Aquí trabajaremos el primer grupo de anillas. Tome lazada e inserte el ganchillo en este punto, estire ligeramente la anilla, tome otra lazada y vuelva a insertar el ganchillo en el mismo punto, repita una tercera vez. Repita el mismo proceso con los 4 grupos de anillas restantes tomando las fotografias como referencia y cuidando de estirar las anillas al largo deseado con firmeza.
Change yarn color at the end of the third row, to begin "embroidering" the leaves in the 4th row. 5 groups of loops are required to complete each leaf. Work 4 sc (up to and including the second ch1 space). We will work the first group of loops here. Yo, insert hook in this space, pull up a loop and tug gently to lengthen the loop slightly, yo, insert hook in same space, pull up loop, repeat once more. Proceed in the same way for the remaining 4 groups of loops, inserting hook as shown in the pictures. Be sure to pull the loops gently but firmly to the desired length.
Change yarn color at the end of the third row, to begin "embroidering" the leaves in the 4th row. 5 groups of loops are required to complete each leaf. Work 4 sc (up to and including the second ch1 space). We will work the first group of loops here. Yo, insert hook in this space, pull up a loop and tug gently to lengthen the loop slightly, yo, insert hook in same space, pull up loop, repeat once more. Proceed in the same way for the remaining 4 groups of loops, inserting hook as shown in the pictures. Be sure to pull the loops gently but firmly to the desired length.

.jpg)
.jpg)
.jpg)
When all groups are completed, yo and pull through all loops in hook.
..jpg)
.jpg)
Asegure con una cadeneta.
Work a ch,
.jpg)
Trabaje un pb en el mismo punto y en los 3 ptos sgtes. La siguiente hojita comenzará en este punto
sc in st used for last group of loops and in the next 3 sts.. Next leaf will begin at this point.
.jpg)
.jpg)
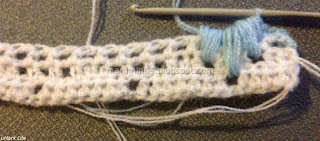
Continúe trabajando las hojitas hasta completar la vuelta. Termine la vuelta con ptos. bajos en los últimos 4 ptos. Levante 2 ó 3 cad (dependiendo si trabaja la base con mp ó pa) y vuelva.
Conitnue working the leaves in this manner to end of row. Finish row with sc in last 4 sts. Ch2 or 3 (2 if working in hdc, 3 if working in dc), and turn.
.jpg)
Comenzaremos nuevamente con la base de filet, para ello trabaje mp (o punto alto) en cada uno de los 3 ptos. sgtes,* trabaje 2 mp (ó 2 pa) en el espacio anterior al cierre de los pétalos y 2 más en el espacio posterior, continúe trabajando 1 mp (o pa) en cada uno de los 5 ptos sgtes., repita desde * hasta terminar la vuelta. Levante 3 cad (si trabaja en mp o 4 cad si trabaja en pa), volver.
Will now start the three filet base rows by working hdc (or dc) in each of the next 3 sts., *work 2 hdc (or 2dc) in the space before the leaf closure, and 2 more in the scpace after, continue working 1 hdc in each of the next 5 sts., repeat from * to end of row. Ch3 (if working in hdc, or 4 if working in dc) and turn.
.jpg)
.jpg)
Para completar esta última vuelta de la base de filet, *saltar un punto de base, mp (o pa) en el sgte. pto, levantar 1cad, repetir desde * hasta completar la vuelta. Cambiar el color de lana en el último punto de esta vuelta para empezar con la siguiente vuelta de hojitas.
To complete the last row of the filet base, *sk 1 st, hdc (or dc) in next st., ch1, repeat from * to end of row. Change yarn color in last st of this row to begin with next row of leaves..
.jpg)
Continué trabajando de esta manera hasta obtener el largo deseado.
Continue working in this manner till desired length is achieved.
.jpg)
NOTA IMPORTANTE: Pruebe trabajar con distintos grosores de lana y agujas. También haga la prueba de hacer un número de anillas mayor (hasta 4 ó 5 anillas por grupo) o menor (hasta 2 anillas) para ver los diferentes efectos que puede obtener.
IMPORTANT: Try working with different yarn and hook widths. Also try increasing or decreasing the number of loops per group (as little as 2 loops - and as many as 5 loops) to achieve different looks.
Espero que la explicación les sea de utilidad. Si prefieren trabajar siguiendo un gráfico, por favor, solicitarlo escrbiendo un email a marupatterns@gmail.com, indicando en el asunto Misterioso 1
I hope you find the instructions useful. If you prefer working with a graph or chart, please, let me know by writing and email to marupatterns@gmail.com indicating Mistery 1 in the subject line.
Versión 2 en el siguiente post!
Version 2 in next post!
3 comentarios:
¡Hola! gracias por el pap tan detallado y bien explicado de esta puntada, que pases un bonito fin ee semana... ¡aaadiúuu!
Muy buena la explicación,¡dan ganas de ponerse a hacerlo ya!
Saludos
Thank you for sharing this! It's a beautiful stitch and I had yet to find instructions.
Publicar un comentario